I know you have all heard about All People Quilt's One Million Pillowcase Challenge. They are trying to encourage people to make pillowcases for charities and then tell APQ how many they have made, so they can reach a grand total of one million. As of 3:45 pm on December 31, 2011, the count is up to 381,941. One of my resolutions for 2012 is to sew and knit up A LOT of my stash, and to do more crafting for charity. I took a short break from Christmas knitting a couple of weeks ago and made a hat for a charity out of a lonely skein of bulky wool that I had languishing in my stash, and it was fast, easy, and made me feel so good to be giving to people who have so much less than I do. Also it was nice to do a quick, mindless project to distract me from mittens with pigs on them and Kindle covers with flaps and buttons everywhere, which is what I was doing for Christmas gifts this year.
In that spirit, we here at Garden Gate Fabrics would like to encourage charity sewing (and/or knitting/crocheting, if that's your thing), so we will be having a Pillowcase Sewing Party! During our normal Sit and Sew time on Tuesday, January 24, we would like to encourage you to come and hang out, eat snacks (of course!) and sew pillowcases with us. Come anytime after 3 or 4, and stay until 7 pm. Pajamas and slippers/other comfy clothes are encouraged. Feel free to bring fabric from your stash, if you have a substantial one like myself. We will also have kits that we will donate if you come and donate your time to sew pillowcases for charity. So we would love to have you come and sew with us that night. Don't forget that we always have Sit and Sew on Tuesdays from 5-7, and would love to see you other Tuesdays besides the 24th as well. Please call and let us know if you'll be coming, so we can make sure there are places set up for everyone. We have a quick and easy pattern for pillowcases, but you can look at the ones on the website above as well, if you'd rather use your own. If you are interested in having your fabric pre-cut when you come, so you can get down to business and sew right away, cut a piece of fabric 27 inches by the width of the fabric for the body of the pillowcase, and a piece 9 inches by the width of the fabric for the cuff. I, for one, am SUPER EXCITED about some serious stash-busting that evening. I may cut a whole pile of pillowcases so I can go crazy sewing! If the thought of sewing with a scary crazy lady makes you worried, you may want to sit this one out. :)
So to recap, come to the shop on Tuesday, January 24, from about 4 pm to 7 pm, bring some fabric to sew pillowcases or we'll have kits here to donate if you want to make them for charity, and get excited about sewing again! Please call if you'll be coming to let us know. Thanks!
PS You can also come and make pillowcases for yourself, and we won't think badly of you. :) Our free kits will only be if you plan to donate the pillowcases to charity, however, so keep that in mind.
Saturday, December 31, 2011
Wednesday, December 28, 2011
Four Sided Placemats
Hi everyone! I wanted to share a project that I made for Christmas presents this year that was very quick and easy. It was also fun for me to put together, which is not always the case, as we know. :)
I made something called the Four-Sided Placemats by Several Settings, a company in New Hampshire. These placemats are actually 4 in one, you choose four different fabrics for each placemat and can change them as you wish. Let me show you a picture:
 This is the picture that comes with the instructions. The instructions are free with purchase of a reusable mylar template that you use to cut the ovals for your placemats. Here are the placemats that I made:

 So this is all the same placemat, and the flaps fold as shown to make the different sides. Obviously when the placemats are in use, you probably would fold down the flap shown on the right, so that your placemat is flat. BUT you can use the placemats however you wish, I don't want to stifle creativity! Each placemat takes 1 yard of fabric total, you can use four fat quarters. I made twelve altogether, three sets of four, and to make a set of four you would need a yard of four different fabrics. You can also put interfacing inside the placemats to make them more stiff, but I didn't find that necessary for mine.
We will be having a class on these placemats on Saturday, January 7. Watch your email for information on times and prices. If you are not on our email list and would like to be, please email us at sylvia@gardengatefabrics.com. Thanks, and happy sewing!
I made something called the Four-Sided Placemats by Several Settings, a company in New Hampshire. These placemats are actually 4 in one, you choose four different fabrics for each placemat and can change them as you wish. Let me show you a picture:


We will be having a class on these placemats on Saturday, January 7. Watch your email for information on times and prices. If you are not on our email list and would like to be, please email us at sylvia@gardengatefabrics.com. Thanks, and happy sewing!
Thursday, November 17, 2011
Project Linus
Today I would like to tell you a little bit about an organization that is special to me. Many of you may have heard of Project Linus, but many of you may not have, so let's talk about it!

Project Linus is an organization that collects blankets made by volunteers and delivers them to children in need in the area. For example, blankets will be given to hospitals, fire departments, and schools. The website lists statistics like the fact that there are 368 total chapters that collect and deliver blankets, and there have been over 4 million blankets delivered so far! That's a lot of blankets!
How can you help this worthy organization? The first way is to make blankets. This quote is directly from Project Linus's website:
A second way to help is to donate money to the organization. You can talk to your chapter's coordinator for information on that, BUT, for a limited time, we are having a raffle in the shop to raise money for the Northern Aroostook chapter of Project Linus. The prize for the raffle is 100 fat quarters, 2 quilting books, and 10 1 yard cuts of fabric. The tickets are 1 for $1, 5 for $3, and an arm's length for $5. We would be happy to fill out some tickets for you if you can't make it into the shop as well. Please let us know if you are interested in supporting Project Linus in this way!
So to recap, Project Linus is a great way to get involved with charity, and you can drop off your blankets (or monetary donations!) to us at the shop. Please ask us if you are interested in getting involved with this charity!
Project Linus is an organization that collects blankets made by volunteers and delivers them to children in need in the area. For example, blankets will be given to hospitals, fire departments, and schools. The website lists statistics like the fact that there are 368 total chapters that collect and deliver blankets, and there have been over 4 million blankets delivered so far! That's a lot of blankets!
How can you help this worthy organization? The first way is to make blankets. This quote is directly from Project Linus's website:
Our volunteers, known as “blanketeers,” provide new, handmade, washable blankets to be given as gifts to seriously ill and traumatized children, ages 0-18. It is Project Linus’ policy to accept blankets of all sizes, depending on local chapter needs. All blanket styles are welcome, including quilts, tied comforters, fleece blankets, crocheted or knitted afghans, and receiving blankets in child-friendly colors. Always remember that blankets must be homemade, washable, free of pins, and come from smoke-free environments due to allergy reasons.You can make blankets and drop them off to us at the shop, or many Marden's stores are also a drop off point, but make sure you call and ask before you drop off a car full of blankets.
A second way to help is to donate money to the organization. You can talk to your chapter's coordinator for information on that, BUT, for a limited time, we are having a raffle in the shop to raise money for the Northern Aroostook chapter of Project Linus. The prize for the raffle is 100 fat quarters, 2 quilting books, and 10 1 yard cuts of fabric. The tickets are 1 for $1, 5 for $3, and an arm's length for $5. We would be happy to fill out some tickets for you if you can't make it into the shop as well. Please let us know if you are interested in supporting Project Linus in this way!
So to recap, Project Linus is a great way to get involved with charity, and you can drop off your blankets (or monetary donations!) to us at the shop. Please ask us if you are interested in getting involved with this charity!
Friday, November 11, 2011
For November: The Friday Bag!
Good Friday, everyone, and Happy Veteran's Day! I hope that those of you who know people who have served or are still serving remember to thank them for their service today.
Today we at Garden Gate Fabrics would like to present November's bag, The Friday Bag! This pattern has two options for your bag, either a quilted option or a reversible option. I chose to make the reversible option, because the only thing better than a new bag is TWO new bags, right?! We all know that I'm a bag lady! Here is my bag, done in bright spring/summer prints because I'm sad about the onset of cold weather, although that does mean more cozy crafting time for me. Not that I let things like outside chores get in the way of my crafting in the summer time, as you may well know.
 This would be one side of the bag, and it features another orange pocket like the one shown on the other side of the outside, if that makes sense? You may notice a little loop there that's looking kind of sad, that is there in the event that I find the perfect buttons for this bag and sew them on. I haven't started looking for buttons yet, which may be contributing to the fact that it doesn't have any buttons on it.
 This is the reverse of the bag, with pockets on the sides instead of the front and back. You'll notice another sad buttonless loop on this side of the bag; two loops get added, and two buttons get added as well, since it's reversible. Cool, right?
So of course I didn't measure the bag, or even try it on my person to give you an idea of how big it is. But I would guess that it would fit nicely on my shoulder, and hit me about at my natural waist, if that makes sense. It's a good sized bag, but not huge. We will be having the class for this bag on Saturday, November 26. This is the Saturday after American Thanksgiving, just as a headsup. The cost for the kit and class will be $42. We will also be offering to cut your bag out for you ahead of time, at a cost of $10 per hour. You will need to pick out your fabrics ahead of time, however, as I won't have time to cut on the day of the class. :) We are recommending that you come pick out your fabrics ahead of time and cut them before the class, if you can, because that will allow you more time for sewing. Please call the shop at (207)764-3800 to sign up for the class, as space is limited! We hope to see you there. Thanks for checking out this month's bag!
Today we at Garden Gate Fabrics would like to present November's bag, The Friday Bag! This pattern has two options for your bag, either a quilted option or a reversible option. I chose to make the reversible option, because the only thing better than a new bag is TWO new bags, right?! We all know that I'm a bag lady! Here is my bag, done in bright spring/summer prints because I'm sad about the onset of cold weather, although that does mean more cozy crafting time for me. Not that I let things like outside chores get in the way of my crafting in the summer time, as you may well know.


So of course I didn't measure the bag, or even try it on my person to give you an idea of how big it is. But I would guess that it would fit nicely on my shoulder, and hit me about at my natural waist, if that makes sense. It's a good sized bag, but not huge. We will be having the class for this bag on Saturday, November 26. This is the Saturday after American Thanksgiving, just as a headsup. The cost for the kit and class will be $42. We will also be offering to cut your bag out for you ahead of time, at a cost of $10 per hour. You will need to pick out your fabrics ahead of time, however, as I won't have time to cut on the day of the class. :) We are recommending that you come pick out your fabrics ahead of time and cut them before the class, if you can, because that will allow you more time for sewing. Please call the shop at (207)764-3800 to sign up for the class, as space is limited! We hope to see you there. Thanks for checking out this month's bag!
Monday, October 24, 2011
October's bag!
Hi everyone! Sorry for the delay in posting about October's bag, we have been dealing with broken computers all over the place, making it very difficult to tell you about the new bag via the internet. I'm going to do a quick blog post to tell you about the bag, a class for which is being held this coming Saturday, October 29, from 10-5. Here it is!
 The bag measures roughly 8-9 inches high not including the handles, 3 inches deep, and 13 inches wide. It has six pockets on the outside, and no pockets on the inside. The kit and class cost will be $26. This bag seems small at first, but it's actually a great size for a purse, as I have discovered. It is a great bag for highlighting a favorite print. If you are interested in joining us for the class, please call (207)764-3800 and reserve your spot. Thanks!

Friday, July 15, 2011
News Bulletin!
Hello, everyone! We interrupt your regularly scheduled programming to share a story with you as to why your regularly scheduled programming isn't happening this month. So sit back and relax while we share!
 Once upon a time, there was a little girl named Alex. She was making a different bag each month for her mom's fabric shop, and teaching classes and in general having a great time with everyone and every bag! However, when the month of July rolled around, and it was really time to have blogged about July's bag already, Alex realized she hadn't even finished making July's bag. This is mostly because she often thinks that she is a superhero and can do everything. She has delusions about what exactly "24-hour day" really means, especially since she likes to sleep at least one-third of those hours.
Alex was feeling kind of bad about this (okay really bad), but knew that all of her bag making friends would understand. So she asked me to tell you this story in the hopes that you will forgive her, and to tell you that July is going to be sort of a month off for bag making, and hopefully she'll finish the bag by August. Time will tell! In the meantime, we hope you are getting lots of outside fun things done, like mowing the lawn and weeding, which Alex is also not doing. Nor is she doing inside fun things, like washing dishes or laundry. What is she doing, you ask? Well, maybe she's out doing superhero things. Or maybe she's just selling candy to kids and carting babies around. You can ask her about her goings on when we return to your regularly scheduled programming. Thanks for your patience, everyone!
 | |
| This is what Alex would look like if she WERE a superhero. |
Wednesday, June 1, 2011
Miss June, the Birdie Sling!
Hey everyone! Look at me, I'm on time this month! So, for June, I made the Birdie Sling (hey look at that, you can click the name of the bag and I've linked it to the webpage with pattern info! The internet is so cool) by Amy Butler. She has some gorgeous designs! Many of her designs are perfect for highlighting big, bold prints, too, which made this bag the perfect pattern for this fabric, which I have been dying to use (and may have several yards waiting at my house to become a dress):
 I have decided, however, that carrying a bag and wearing a dress made from the same fabric might be a bad idea. So, without further ado, here is the bag!


I did actually have a picture of the bag by itself, but I did something to the file and now it's lost forever. So anyway, this bag is pretty big, as you can see. I didn't measure it before I dropped it off at the shop, of course, because that would have been smart and I'm just not into that. But it has one large, wide handle, that felt really comfortable without anything in the bag (I should have put some stuff in there to test it out!), and it has a large pocket on one side of the lining that is divided in two, and a small pocket on the other side of the lining. Here's a vague picture of the inside, since the pockets are the same fabric as the lining, so it's hard to tell:

This bag would be great for carrying projects in, like handwork for long road trips or the like. But let's be serious, I would use this honking bag as a purse. I would probably never be able to find anything, but I would look so fab while digging through it. I also meant to put a magnetic snap in the top to hold it shut, but I got so excited about how fast the bag was coming together that I totally forgot. I made a couple of modifications to this pattern (shocker), but I won't let you in on them unless you take the class! See what I did there?
So, here are some things I love about this bag. I love the size (yes, we already discussed that I use huge purses). I could carry a set of twins in there, if I wanted to (which would be totally unsafe, so don't try it. I won't take the fall for that one). I also love this fabric, and the bag highlights it wonderfully. There are also some really sweet little designy things about the bag (I'm trying to think of the right word for "designy things," but it escapes me at the moment) that I just love. For example, the top of the bag has six little pleats on each side.

I am such a sucker for pleats. I want to add them to everything, especially places where they are not appropriate at all. I'm also a sucker for paisley fabrics, such as this yellow coordinating fabric. I also love butter, which matches this coordinating fabric, but we don't need to talk about that.
Also, at the bottom, where on lots of other bags the corners are brought in to box out the bottom of the bag (does that make sense?), the corners are brought in on this bag too, but the line sewn is curved rather than straight, making the corners just so elegant-looking! I don't get out much, so little things like this excite me. Don't I look excited?

So basically I would give this bag a billion thumbs up, and the pattern is very well-written as well, which is really nice. The class for this bag will be held on Saturday, June 25, and the price for the kit and class will be $60. This will get you all of the fabric, interfacing, pattern, and all of my secret modifications (oooh intrigue!), and as an added bonus, you'll get to spend the whole day laughing at a crazy teacher who makes lots of mistakes. Call the shop at (207)764-3800 or email sylvia@gardengatefabrics.com to sign up for the class.
Thursday, May 19, 2011
Grommet Grab Bag
Hello everyone! Just wanted to share May's bag with you, the Grommet Grab Bag by Indygo Junction. Here's the bag...

And here is the inside....


And here is the inside....

Yes, those are raw ends on the handles. I was in a rush to finish the bag before my husband and I took a 15 hour road trip to a wedding, so I could carry the bag to the rehearsal dinner, since it matched my dress. In fact, I made my husband take the car to get gas by himself before we left so I could topstitch the handles. If you think that sounds crazy, let me tell you that's pretty much my life. Never a dull moment! Needless to say, my husband is very patient.
The bag measures about 14.5 inches long and 3 inches wide at the base, and about 13 inches long at the top. It's also about 13 inches tall without the handles. As you can see from the picture, it flares out in the middle. It also has two pockets on the inside, one of which I divided in half, and the other got divided into thirds. When the bag is filled with stuff (like a checkbook, envelope system, wallet, wire cutters, and a leatherman, for example), the weight of the bag makes the handles cinch up nicely on the grommets. I did intend to get a picture of the bag in action over the weekend, but it just didn't happen. It was kind of a crazy weekend, to say the least. So anyway, I really enjoyed using this bag as an all purpose purse.
The price for the kit and class together will be $48. We currently have one class scheduled on Saturday, June 4, but it is full. There are no other times scheduled thus far, so if you would like to come and make the bag, give us a call at (207)764-3800 or email sylvia@gardengatefabrics.com, and we can talk about times that work for you. The shop is closed on Mondays, so those are good days for classes. Let us know if you would like to come, and we'll work something out for you. Hope you are enjoying the sun!
Saturday, April 2, 2011
April's snappy tote!
The bag I made for April is pretty simple, and it uses something that many of us have around our house: metal tape measures. Especially broken ones. What, you don't keep those?
This past summer I went on a missions trip with my church's youth group (I went as an adviser, NOT a youth :)), and one of the boys, in his haste to look cool, broke a tape measure. It was in the garbage pile, and I salvaged it from the jaws of death! Or I grabbed it from the top of the pile and shoved it into my backpack. It didn't really fit though, so all day everyone was asking me why I had a tape measure sticking out of my backpack, and why I wanted a broken one, and my answer of, "I have a bag pattern that uses a metal tape measure," got me looks of confusion, so I just started saying, "I'm going to use it for something." That seemed to satisfy most everyone.
Anyway, I've finally made the bag with my broken tape measure, and it's so great! I made the tote size, which ended up being around 15.5" tall without handles, 15.5" wide, and 5" deep, and the pattern I used has the tote size and a purse size, which is around 10" square. The broken tape measure is in the casing of the bag, to keep it snapped closed when you're not using it. Cool, huh?
 This bag also has two pockets inside, for holding all of your important things!
This is an excellent bag for highlighting that piece of fabric that you've seen in the shop, but don't know what to do with because you can't bear to cut it up. And, you'll look totally fab sporting it around town!
Since there are two bags in this pattern, we'll be offering two kits, one for the purse and one for the tote. The prices will be as follows:
Kit and class for the purse size (10" square) is $30.
Kit and class for the tote size (16" square) is $41.
Please call the shop at (207)764-3800 or email sylvia@gardengatefabrics.com for more info or to sign up for the class, which will be scheduled for April 30 at 10 am.
This past summer I went on a missions trip with my church's youth group (I went as an adviser, NOT a youth :)), and one of the boys, in his haste to look cool, broke a tape measure. It was in the garbage pile, and I salvaged it from the jaws of death! Or I grabbed it from the top of the pile and shoved it into my backpack. It didn't really fit though, so all day everyone was asking me why I had a tape measure sticking out of my backpack, and why I wanted a broken one, and my answer of, "I have a bag pattern that uses a metal tape measure," got me looks of confusion, so I just started saying, "I'm going to use it for something." That seemed to satisfy most everyone.
Anyway, I've finally made the bag with my broken tape measure, and it's so great! I made the tote size, which ended up being around 15.5" tall without handles, 15.5" wide, and 5" deep, and the pattern I used has the tote size and a purse size, which is around 10" square. The broken tape measure is in the casing of the bag, to keep it snapped closed when you're not using it. Cool, huh?

This is an excellent bag for highlighting that piece of fabric that you've seen in the shop, but don't know what to do with because you can't bear to cut it up. And, you'll look totally fab sporting it around town!
Since there are two bags in this pattern, we'll be offering two kits, one for the purse and one for the tote. The prices will be as follows:
Kit and class for the purse size (10" square) is $30.
Kit and class for the tote size (16" square) is $41.
Please call the shop at (207)764-3800 or email sylvia@gardengatefabrics.com for more info or to sign up for the class, which will be scheduled for April 30 at 10 am.
Tuesday, March 15, 2011
Market tote for March
And now, the long awaited Market tote for March 2011, just in time for Earth Day in April!
 This is a market tote with one long handle, and two shorter ones:


The bag measures 14" high, not including handles, by 10" wide by 6" deep. This project is great for highlighting some of your favorite fabrics!
If you are interested in participating in a class for this bag, we will be having one at our National Quilting Day Party on March 18 and 19, one each day. This is a fast project. We can also schedule another class in April, our class on March 26 is already full. Please email (sylvia@gardengatefabrics.com) or call (207-764-3800) for more information. Hope to see you soon! :)
Sunday, February 13, 2011
February's bag!
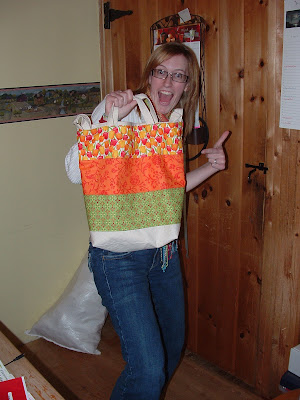
Hi everyone! Sorry I'm so late telling you about February's bag! For February I made a diaper bag, because it seems like everyone I know is having a baby. This would also be really cute as a purse too. Here are some pictures to show you just what it looks like!
 This is the front of the bag, obviously. :) It has a strap that matches the lining fabric that comes around the bag and secures with D-Rings.
 This is the back of the bag, which looks suspiciously similar to the front.
 This is the bottom. The pattern includes a piece to cute a plastic template for the base of the bag.
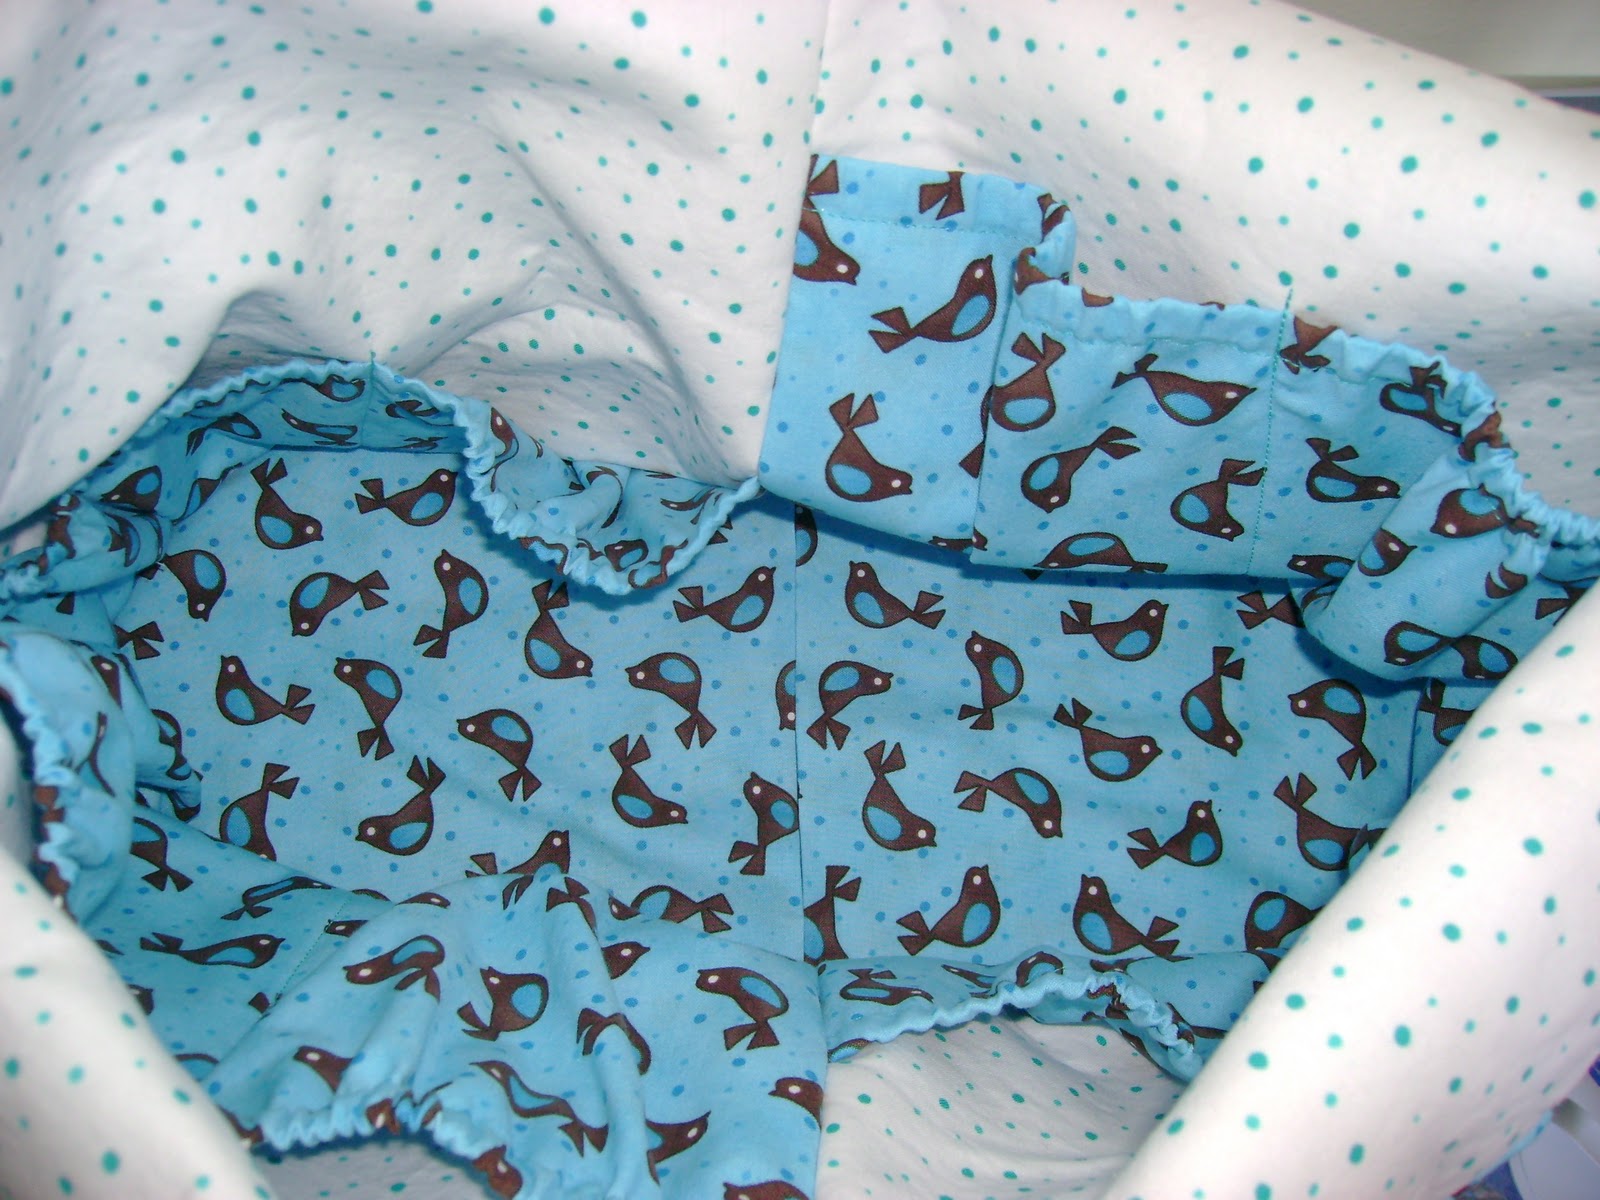
 This is a sad looking picture of the inside. There are eight pockets with elastic tops, so they will not be poochy or anything like that. This is quite a roomy bag, I of course didn't measure mine and it's currently at the shop, so I can't measure it. The pattern states that the bag dimensions are 14" tall, 20" lengthwise, and 9" deep. The straps are nice and fabric-y too (is that a word?), so they are comfortable. This pattern is done with paper pattern pieces, which Sylvia is going to give us some tips on, because Alex is not good at it. :)
We are having a class for this bag Saturday, February 19, from 10-4, and we have room for a few more people. If we need to, we will have another class, and we will have to schedule it Saturday, March 12 (tentatively), or sometime during the week. If you are interested, call the shop and see what's going on. The number is (207)764-3800, or email sylvia@gardengatefabrics.com. Thanks, see you soon!


We are having a class for this bag Saturday, February 19, from 10-4, and we have room for a few more people. If we need to, we will have another class, and we will have to schedule it Saturday, March 12 (tentatively), or sometime during the week. If you are interested, call the shop and see what's going on. The number is (207)764-3800, or email sylvia@gardengatefabrics.com. Thanks, see you soon!
Thursday, January 6, 2011
Introducing Miss January!
Garden Gate Fabrics is proud to present the first bag of the Bag of the Month for 2011, January!


Pattern: 4th Quarter Bag by Silk Road Creations
Fabric: Arabesque from Benartex
Kit: cost is $25, and that includes fabric to make the bag, fusible batting, hardware, pattern, and Alex's tips and tricks.
Class: A class for making this bag will be held Saturday, January 29 at 10 am. The price for the kit and the class will be $30. Please sign up so we can make sure we have enough materials and space.
This bag was really fun to make, and reasonably priced. It's also a good size. It is 9.5 inches tall without the handles, and 16 inches tall with them. It is 9.5 inches wide as well, and 3 inches deep. If you actually follow the pattern you might get a slightly larger bag, I had to do some fudging throughout due to lack of reading all directions first. :) It has 12 pockets on the inside, and 2 pockets on the outside. Overall, it would make a great everyday purse. The fusible batting that I used helps the bag to keep it's shape really well too. Please join us in making a bag a month for 2011! In closing, here are some gratuitous shots of the bag from other angles.


Subscribe to:
Posts (Atom)