I spent the morning knitting, and will be spending the afternoon sewing, in an attempt to get homemade Christmas gifts done by Christmas. There's a first time for everything, right?
Here is how the conversation in my head has been going (and yes, I do talk in my head while I'm home alone, knitting and sewing. The cats got tired of me talking to them):
"Wow, there isn't any snow, I have lots of time to get these gifts done! I am so ahead of schedule!"
Pause to pat self on back and slow down a little on the knitting.
Glance to the right, where there is a chalkboard reading, "11 days until Christmas!"
"GAH!" knitknitknitknitknitknitknitknitknitknit
"Wow, the sun is out!"
Slow down on knitting.
Look at chalkboard again.
"ARGH!" knitknitknitknitknitknitknit
Repeat.
This has been going on for about 5 hours now, no exaggeration. I told someone last week that I thought I was going to get everything done for Christmas before Christmas actually got here, and now that statement is coming back to haunt me. But really, it's December, and there is little to no snow, and it's 50 degrees outside, in northern Maine. Can you blame me for thinking I'm way ahead of Christmas this year?
Tuesday, December 14, 2010
Tuesday, December 7, 2010
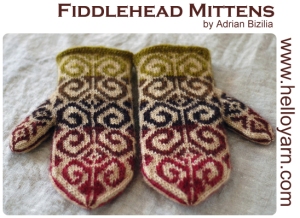
Fiddlehead Mittens
Hi everyone! Remember when I told you all about those Fiddlehead mittens I was making for Chelsea? Well, they are done!


These mittens turned out SO SO great, in spite of all of my craziness.
First of all, the pattern is way terrific, and definitely worth the $5.95 I paid for it. If you are interested in the pattern (which you should be after reading my post!), you can find it here. I have never, that I can remember, knit a pattern without changing it at least a little bit, and this pattern I knit just as the designer said. I did make one modification, but I regretted that afterward (and you'll read about it below). First reason why I like them: these mittens have a gusset thumb. Many of the colorwork mittens I've seen have afterthought or peasant thumbs, which is pretty much leaving a slit in the palm, then when you're done knitting the mitten you go back, pick up the stitches above and below the slit, and then knit your thumb from there. It ends up being quite a bit more flat, and I'll admit it does look better on colorwork mittens, but it looks uncomfortable to me. That is possibly because I have big thumb joints, however. So anyway, I prefer the gusset thumb, which gives lots of room for my joints. Another nice thing about this pattern is that the designer has so many tips and tricks and really explains everything in the pattern. There were five pages of instructions, I think. It's also one of the most popular patterns on Ravelry, so you can find lots of great tips there.
This pattern also included a chart for the mittens, which was really easy to follow, and told you where to put what colors. I know that one would normally expect a chart of such caliber in a pattern for mittens like these, but I was really excited about having a good looking and easy to read chart. You can do it with five contrast colors and one background color, or I did mine with one contrast and one background. This pattern also involves picking up stitches and knitting a liner out of some fuzzy wuzzy yarn that will feel great on your hands after you're done the outer mitten. More on why I didn't do that later. So in short, I guess what I'm telling you is that if you haven't already gotten this pattern, do it. It wouldn't be too hard for a beginner type knitter. I wouldn't make it your first project, for sure, but that's mostly because of the thumb gusset, rather than the colorwork. Knitting designs in colors is way easier than it looks, so I would encourage any and all of you to try it! The thing to keep in mind while knitting with multiple colors is to not make the yarn that you are carrying in back of the yarn you are actually using at the time too tight. That is a common problem with colorwork.
So now I'll tell you what I did with these mittens! I used Plymouth Galway Worsted yarn, which is one of my favorites for 100% wool. I was going for the small size, but when I did my gauge swatch I used a size 7 needle rather than the required size 3 needle, and I got the correct gauge (so I thought!), so I went up four sizes. That's pretty normal for me, so I wasn't worried about that. I did the cast on specified in the pattern, which took a long time but was worth it because it came out great. I then followed the chart exactly for both mittens. These went quickly, because I was so excited to see the next row of the pattern that I didn't want to stop. I actually swapped the colors for the second mitten, which you can tell if you look closely: I used the pink for contrast color in one mitten, and blue for the main color, and vice versa for the other mitten. So I got to the top of the first mitten, knit the second mitten, and then knit the thumbs. Here's where my modification came in; I left out three rows of the thumb, because Chelsea has short thumbs and I was worried about it being too long. So once I finished the thumbs of both mittens, I was WAY excited because they were so beautiful! They did look slightly huge, but I wasn't worried because I was knitting the liner that would fit her hand perfectly. I was a little depressed about having to go and knit two more mittens for liners, but that would just make them all the better, so I set them aside and did some other knitting first, since these were for Christmas and I was way ahead of schedule. We had picked out Plymouth Mulberry Merino for the liner, which is a blend of silk and merino wool. Merino is supposed to be the softest sheep wool around, and so far I believe it. This yarn is silky soft and smooth, although it did tend to stick to itself while I was winding it. Maybe that's normal for silk? Anyway, so I decided for fun I would measure my gauge again on the finished product. Turns out I got the gauge for the largest size, rather than the smaller. So I thought, no big deal, they're 100% wool, I'll just felt them down a little bit to make them the right size, and then I'll knit the liner. I had never actually felted anything before, but I thought how hard can it be? I just toss them in the wash with hot water and bam! Smaller mittens! First I thought I should try handfelting, since I didn't want them to turn into baby mittens, so I filled up my dishbasin with hot water and a smidge of detergent. I dunked the mittens in, and they got LARGER. I rubbed them and agitated them, and they got larger still. At this point I was panicking a little bit, and I had to make supper, so I threw them in the washing machine with two pairs of jeans with the idea to check them every 5 or 10 minutes. I did that, and every 5 minutes that I checked them, they kept getting larger. I put them through two full cycles, and they were not getting any smaller. Then I pulled up a felting tutorial online, which said first of all that it's normal for the knits to get larger first (PHEW!) and to put the knitted items in a pillowcase. I had read this elsewhere but thought it wouldn't make that much of a difference. However, I tried it. I threw the mittens in a pillowcase, and put a rubber band around the top so they wouldn't come out. I left the two pairs of jeans in the washer, and started the cycle. I then got involved with making supper and possibly watching tv, and forgot about the mittens, so neglected to check them at all during the cycle. Once the washer was done, I pulled the mittens out of the pillowcase, and they had shrunk about 4 inches in length. AH! I took a deep breath, and pulled them on my hands. Wet felted stuff doesn't really feel good on, and it smells really bad. But I held my breath and tried them on, and they fit PERFECTLY. I was so elated! Although, since I had made the thumb a little shorter before I knew I was going to felt them, the thumb could have been longer. So that's the one modification I made to this pattern, and I should have just let it alone. So as I was dancing around my kitchen in wet, smelly mittens that were gorgeous and the perfect fit, I thought, "Gasp! There is now no room for that fuzzy liner!" They fit so perfectly that introducing a liner would have made them way too tight. I felt a little bad for Chelsea about that, but then I felt better because it meant instead of being 50% done the mittens, I was 100% done the mittens! I then wrapped them up and gave them to Chelsea (as a general rule, I give Christmas presents when they're done, rather than at Christmas. This is because they're usually finished after Christmas). She had picked them out herself anyway, so there wasn't any surprise. They fit her perfectly too! She was very excited, and I hear has been wearing them around everywhere, trying to make other people excited about them too. She's a good friend, and a great knitting model. So Chelsea's mittens are done, and the liner yarn has been repurposed for a scarf for my sister, which might be done for Christmas but I haven't even started it yet so maybe not. I remember one Christmas, I was knitting a scarf for my now husband, but then boyfriend, and I needed another skein. I was going to his family's house Christmas night, and I recall wondering if Wal-Mart was open on Christmas so I could get another skein and knit all day to finish the scarf for Christmas night. I was pretty young, and also obviously delusional. But, nothing has changed except my age. :)
So that was a super long post about one pair of mittens, sorry about that! I've been knitting lots of other things too, and I'll share them soon, once I have pictures. I'm feeling pretty good about my Christmas knitting and sewing deadlines, which means that karma is probably going to kick me in the teeth pretty soon. Good thing I don't believe in karma. Good luck with your crafting!
Wednesday, November 10, 2010
Thrummed mitten pattern
Hey everyone! I just wanted to let you know that I am now a published pattern designer! Whoo! Really, I took three different mitten patterns and put them together, and now I'm pretending to be a pattern designer. :) I gave the three patterns credit, though, so I can't get in trouble, right?...
I put the pattern I used for the thrummed mittens up on ravelry. If you're not on ravelry and you're a knitter or crocheter, you should be! It's kind of like facebook, except everyone is a crafter. You can look up patterns that you are thinking about doing (or currently doing), and get other people's notes and input on them. It's pretty great. If you are interested in viewing this pattern in pdf form, you'll need to sign in to ravelry (or create an account), and find me. My user name is alexandy. Then you can click on "my original designs" next to my name, and you'll see the pattern! Alternatively, you can go under the patterns tab and search for "thrummed mittens with gusset thumb" and you should find it. I would love to hear your thoughts if you try these. They weren't that hard, just a little time consuming to make all those little puffy thrums. Happy crafting!
I put the pattern I used for the thrummed mittens up on ravelry. If you're not on ravelry and you're a knitter or crocheter, you should be! It's kind of like facebook, except everyone is a crafter. You can look up patterns that you are thinking about doing (or currently doing), and get other people's notes and input on them. It's pretty great. If you are interested in viewing this pattern in pdf form, you'll need to sign in to ravelry (or create an account), and find me. My user name is alexandy. Then you can click on "my original designs" next to my name, and you'll see the pattern! Alternatively, you can go under the patterns tab and search for "thrummed mittens with gusset thumb" and you should find it. I would love to hear your thoughts if you try these. They weren't that hard, just a little time consuming to make all those little puffy thrums. Happy crafting!
Thursday, October 28, 2010
mittens galore!
Hi everyone! I've been knitting mittens like crazy, and I wanted to share one finished pair with you. As I mentioned before, I was making thrummed mittens for my mother in law. Her grandmother, my husband's great grandmother, always knit their whole family double knit mittens, so they were warm, windproof, and just all around great. As she is now 95 and has advanced arthritis in her hands, it's become my job to knit everyone mittens. I obviously hate it. :) So last year I knit my brother in law some mittens. My husband and his brother both have big hands, so it was a large undertaking, to say the least. Ever since I knit Gabe's mittens, my mother in law has wanted mittens as well.
 | |
| Gabe's mittens, in all of their glory |

Anyway, one pattern I used was the Yarn Harlot's thrummed mittens tutorial, which she did on her blog, and that tutorial can be found here. I also used a pattern called Thrummed Mittens on 2 needles, which can be found here. The Yarn Harlot's was knit in the round, so I followed the directions for that, but I didn't like the thumb on hers, so I used the thumb from the pattern for 2 needles (which were knit flat), adapting it for knitting in the round. What I basically ended up doing was using my favorite mitten pattern and knitting in thrums every third stitch on every fourth row, offsetting them a stitch for every thrum round to get the spiral pattern. I followed the instructions on the Yarn Harlot's blog for making a thrum and knitting it in.
All in all, these mittens turned out really great. My mother in law loves them, and everyone who tried them on now wants a pair. I informed everyone that there is a long waiting list, however. :)
I also started the owl mittens and the fiddlehead mittens from the last post, and I'm really enjoying them. I can't show you any pictures however, because my camera is on vacation in Guatemala. The owl mittens are very cute, and I managed to finish one mitten in two days, mostly because I kept saying, "I'll do one more row so I can see the pattern!" However, I picked gray yarn for the background, and it is beautiful yarn, but more suited to a lacy scarf than mittens. I have decided to rip out the mitten I did and redo it in different gray yarn, and make a scarf for SOMEONE for Christmas out of the first gray I bought. The fiddlehead mittens are turning out gorgeous, because Chelsea picked beautiful yarn (she always does, she has great taste), and a beautiful pattern. She has been present for most of the progress on them, and she is very excited. They are going pretty quickly, the only thing is that when I'm done the two mittens, I have to go back and knit a lining for each one. Oh well, the things we do for our sisters!
So there is an update on what I've been knitting recently. I'd love to hear what everyone out there is making, whether knitting, sewing, scrapbooking, or whatever else you do! What are your homemade Christmas gifts? Do you have anything you tend to make time and again because it's quick and easy? Share your thoughts with us, and keep crafting! :)
Saturday, October 9, 2010
March's bag, and current projects
Hey everyone! Sorry I didn't blog last week, we had a crazy day in the shop! We didn't have very many votes for March's bag; in fact, there were only two! As a result, we had to flip a coin to choose the bag for March. The winner was the Be Green Market Bag from Paradiso Designs:

 They are super cushy. I have the first one done except the thumb, and I'm working on the cuff for the second one. They are actually quite quick to knit once you figure out what you're doing. I'll give more details about yarn and patterns used when I'm done.
I also bought yarn this week for three more pairs of mittens for family members, my two sisters-in-law and my future sister-in-law. They each picked out their own mittens, and these are what they chose:

We have discussed our plan at the shop for the Bag of the Month, and decided that it's a lot of pressure for you to choose twelve bags in rapid succession. So what we're going to do is start with these three bags, and we'll choose the rest of them. If anyone has an objection to this, please let us know and we'll do something else. Otherwise, we'll take care of choosing the rest of the bags and let you know what we'll be doing for each month as it's happening.
In other news, it's cold out! What have you been doing for crafts lately? Sylvia has been working on several different quilts. One of them was a quiltalong that she and I did at my church this summer, the disappearing 9 patch. Click here to view a post from a different blog about this pattern. Hopefully she will share pictures soon, she's almost done putting the final borders on it!
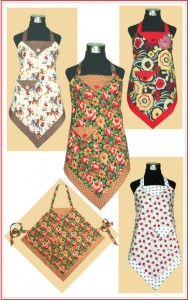
I've been working on lots of different things too. I have made quite a few of the Four Corners Apron, which is really fast and fun. It's also easy to make in a variety of different fabrics.
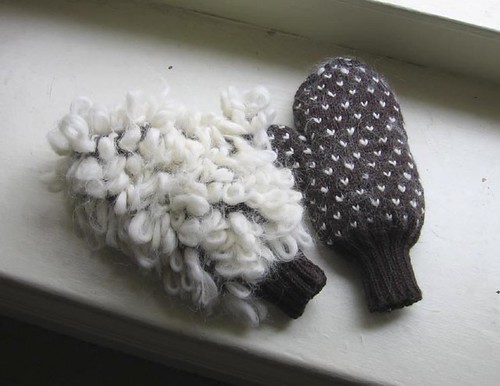
I also have several quilts I'm working on, most of which are gifts so I can't tell you about them yet. :) I did finally finish a quilt that was a gift for a wedding in 2008. Yikes! I'm also getting ready to revamp some furniture in our living room. I made new cushions for a loveseat that was a gift from my parents when we got married, but they aren't really comfortable, and I figure that two and a half years of uncomfortable furniture is long enough, and it's time to redo it! I'm hoping to use extra foam and polyester batting to make the cushions extra cushy and comfy. Mostly, however, I've been knitting. Right now I'm working on a pair of thrummed mittens for my mother-in-law. This is what they will look like when they're finished (the left one is inside out):
I also bought yarn this week for three more pairs of mittens for family members, my two sisters-in-law and my future sister-in-law. They each picked out their own mittens, and these are what they chose:
These are for Chelsea, my future sister-in-law. These are fine and dandy, but what you can't see is that there is a lining in these mittens that is another mitten, so basically I'm knitting four mittens for her. It's a good thing I like her! :) My sister-in-law Hannah chose these Owl mittens:
Her mittens will be made with a gray background and rosey pink owls, to match her jacket. Claire chose mittens with flamingos on them:
Her mittens will have a black background with darker pink flamingos to match her jacket. I also may or may not have promised my hairdresser and her daughter mittens as well (yes, I'm crazy too), so I'll be knitting mittens for awhile. I'm really hoping to get some sewing in there too. If I'm lucky.
What are you working on during this cold weather? I'd like to say that cold weather makes me get back into crafting, but I never really stopped over the summer so that would be a falsehood. Cold weather makes me want to stay home and craft all the time, however. We would love to hear what you're working on, especially if you want to share pictures! Stay warm, and we'll see you soon!
Saturday, September 25, 2010
How about a little bag for April?
Hello everyone! Thanks for your votes on February's diaper bag. And the winner is the Mama Mia bag!

Okay, so voting for March's bag will still be going until October 2, and voting for April's bag will start today, September 25, and end October 9. Phew! That's a lot of dates to keep track of. Hopefully you'll like what I have for you this month!
I thought that since prom season will be rapidly approaching at this point, we could look at doing a little handbag or clutch that could easily be used as a formal accessory or for casual, everyday use, depending on the fabric you choose. As always, if you would like to do something different, let me know!
Bag number 1 is the Charming Little Purse-O-Nality by Linda Rauld:
 This handbag can be made with either a wrist strap or a shoulder strap, or both! The strap connects with a hook, so you can change them out if you'd like. The dimensions of this bag are 8.5" by 5" by 1.5".
Bag number two is the Haute Handbag and Clutch by Artful Offerings:
 This pattern is for both bags, and the handbag dimensions are 11.5" by 15.5" by 4.5", and the clutch measures 5.5" by 11" by 2".
Bag number three is the Cash and Carry change purse by Atkinson Designs:
 This pattern includes directions for three different sized change purses. The top one can be made 3.5" by 5.5" OR 3.5" by 7.5". The one all the way to the right is also 3.5" by 5.5" or 3.5" by 7.5", and the bottom one is 3.5" by 5.5". The top two are called "Strip Zips," and they are made with strips (obviously). The ones on the right might make two at a time, or they are two stuck together? I'm not really sure on that one. And the one on the bottom is just a simple change purse. I'm reading all about the way cool zipper technique included in the pattern, so I might just have to try it out anyway!
So let me know what you think about April's bag, and I'm looking forward to hearing from you!
Okay, so voting for March's bag will still be going until October 2, and voting for April's bag will start today, September 25, and end October 9. Phew! That's a lot of dates to keep track of. Hopefully you'll like what I have for you this month!
I thought that since prom season will be rapidly approaching at this point, we could look at doing a little handbag or clutch that could easily be used as a formal accessory or for casual, everyday use, depending on the fabric you choose. As always, if you would like to do something different, let me know!
Bag number 1 is the Charming Little Purse-O-Nality by Linda Rauld:
Bag number two is the Haute Handbag and Clutch by Artful Offerings:
Bag number three is the Cash and Carry change purse by Atkinson Designs:
So let me know what you think about April's bag, and I'm looking forward to hearing from you!
Saturday, September 18, 2010
Go green with a market tote! And, the winner for January's bag.
Thank you to everyone who submitted votes for January 2011's bag! The votes have been counted, and the winner is The Fourth Quarter Bag! So get excited to make this bag in January! Woop woop!

As some of you may know, Earth Day is April 22 each year. 2011 will be no exception! For March's bag, I would like to make a market tote, so you'll be all ready to display it with pride when you go to the grocery store in April. These also make great gifts. I have found three bags for us to choose from for March.
The first bag is the Be Green Market Bag from Paradiso Designs:
I think it's pretty clear that if you want to make this bag you have to have a huge dog. Just kidding! That was hopefully my only lame joke for this post. The dimensions of this bag are 10" long, 14" tall and 6" wide.
The second bag is the Eco Market Tote by Favorite Things:
 This bag may or may not have an outside pocket (it's hard to tell from the picture, and it's amazing how non-descriptive some pattern descriptions are!), and the dimensions are 15" high, 18" wide, and 4.5" deep.
The third bag is the Chic Shopper's Tote from Bella Nonna Designs:
 This bag has a smallish outside flap pocket, and the dimensions of the bag are 17" wide, and 16.5" tall with an 8.5" bottom.
You will have until Saturday, October 2 at noon to vote on March's bag. Thanks for your consideration, and I look forward to sewing with you! :)
As some of you may know, Earth Day is April 22 each year. 2011 will be no exception! For March's bag, I would like to make a market tote, so you'll be all ready to display it with pride when you go to the grocery store in April. These also make great gifts. I have found three bags for us to choose from for March.
The first bag is the Be Green Market Bag from Paradiso Designs:
The second bag is the Eco Market Tote by Favorite Things:
The third bag is the Chic Shopper's Tote from Bella Nonna Designs:
You will have until Saturday, October 2 at noon to vote on March's bag. Thanks for your consideration, and I look forward to sewing with you! :)
Saturday, September 11, 2010
Choosing February's bag!
Okay everyone! We've had some votes for January's bag, and voting will be open for another week. Voting for February's bag will start today, and will end Saturday September 25 at noon. Just a reminder that we will have voting for a new bag out every week, and each month will be open for voting for two weeks, so there will be some overlap. Please contribute your votes!
For February, I thought it would be fun to do a diaper bag. I don't know about you guys, but it seems as if when spring starts I have a never ending list of people I know who are having babies, and I feel that I have to make something for each and every one of them. Diaper bags are nice because they are handy, and they are (hopefully) easy and quick for the person making them. Even if you say to yourself, "Pah! I'm not doing this month's bag because I don't know anyone having babies," it would be nice to make and donate to your local pregnancy care center, or just in case someone you know someday has a baby. Anyway, I have three choices for this month, but if you have any suggestions please feel free to put them in the comments!
Bag one is the Mama Mia Diaper Bag from Favorite Things:
This bag includes 8 elasticized inside pockets, as well as a pattern for a changing pad that folds up into a clutch style piece with pockets for diapers and wipes. This would double as a great tote bag, as well. :) This bag's dimensions are 14" high, 20" wide, and 9" deep.
The second bag is the Nappy Bag from Amy Butler:
 This bag includes a changing pad as well, with it's own storage case. There is also a cell phone pocket on the outside. This bag would also make a great tote bag if you don't want a diaper bag. This bag's dimensions are 24" wide and 29" tall.
Bag three is the Double Duty Bag from Sew Baby:
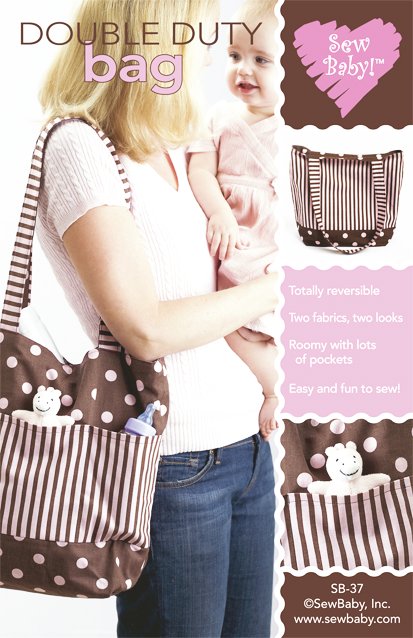 This bag is reversible, and six roomy pockets on one side. This pattern also includes directions for a changing pad. The bag dimensions are 17" high, 14" wide, and 5" deep.
Those are the options that I found for diaper bags. Again, if you see something else you like and would like that put in the running, feel free to mention it. You will have until September 25 at noon to vote for February's bag. Thanks!
For February, I thought it would be fun to do a diaper bag. I don't know about you guys, but it seems as if when spring starts I have a never ending list of people I know who are having babies, and I feel that I have to make something for each and every one of them. Diaper bags are nice because they are handy, and they are (hopefully) easy and quick for the person making them. Even if you say to yourself, "Pah! I'm not doing this month's bag because I don't know anyone having babies," it would be nice to make and donate to your local pregnancy care center, or just in case someone you know someday has a baby. Anyway, I have three choices for this month, but if you have any suggestions please feel free to put them in the comments!
Bag one is the Mama Mia Diaper Bag from Favorite Things:
The second bag is the Nappy Bag from Amy Butler:
Bag three is the Double Duty Bag from Sew Baby:
Those are the options that I found for diaper bags. Again, if you see something else you like and would like that put in the running, feel free to mention it. You will have until September 25 at noon to vote for February's bag. Thanks!
Saturday, September 4, 2010
And......we're back!
Hi everyone! I bet you didn't think that the blog would be taking the summer off, did you? Well, neither did I! I was so busy this summer that I had very little free time, and what free time I did have was spent knitting and sewing. I do hope you'll forgive me for that!
We just got back from the Houlton Quilt Show, and we had a great time! We have lots of pictures, so we'll share them with you soon. But I want to talk about something else that we are very excited about today! Starting in January of 2011, Garden Gate Fabrics will be doing a bag of the month club. We'll do a different bag each month, and you can purchase the kit complete with pattern, and we will also offer a class each month for whatever bag we make. I have looked through a lot of patterns, and now we're going to let you choose what you would like to do each month. What I'll be doing is posting a couple of choices for each month, starting now. We'll leave the choices up for voting for two weeks, but I'll post a new month of choices each week so we will hopefully have chosen all 12 bags for 2011 before 2011 actually starts! You can submit your vote by commenting on the blog post. Also, if you are interested in doing a bag a month with us, but live far away, we will definitely ship a kit to you, so you can be a part of the fun too! So, on to the fun part!
For January, I thought we could start with a simple pieced tote/handbag. I'm going to show you three different patterns that I thought were cute, and you can choose your favorite or tell me if you don't like any of them.
The first bag is called the Building Blocks Bag, from Indygo Junction:
 This pattern includes instructions for both bags, which are made using 6.5 inch squares. I've been told this pattern is pretty simple as well, which is always a plus! :)
The second pattern is called Charming Totes 4 from Whistlepig Creek. This pattern uses charm packs.
 This pattern includes instructions for all three bags. Additional yardage will likely be required for lining, handles, etc. Using precuts is always fun, and makes things faster, as some of you know.
The third pattern is the 4th Quarter Bag from Silk Road Creations.
 This pattern uses 4 fat quarters, and has 14 pockets. Wowzah! Talk about a place for everything, and everything in its place!
So all that I need you to do is comment on this post and say which bag you would prefer to sew in January, or if you would rather do something totally different. If you aren't interested in doing a bag of the month on 2011, that's okay too! Hopefully we can find something else to keep you busy. So let me know what you think, and let me know if you have any suggestions for bags for 2011. Thanks!
*IMPORTANT!* Voting for January's bag will end on Saturday, September 18 at noontime EST (just in case anyone is in a different time zone!). Voting for February's bag will begin Saturday, September 11. Happy sewing!
We just got back from the Houlton Quilt Show, and we had a great time! We have lots of pictures, so we'll share them with you soon. But I want to talk about something else that we are very excited about today! Starting in January of 2011, Garden Gate Fabrics will be doing a bag of the month club. We'll do a different bag each month, and you can purchase the kit complete with pattern, and we will also offer a class each month for whatever bag we make. I have looked through a lot of patterns, and now we're going to let you choose what you would like to do each month. What I'll be doing is posting a couple of choices for each month, starting now. We'll leave the choices up for voting for two weeks, but I'll post a new month of choices each week so we will hopefully have chosen all 12 bags for 2011 before 2011 actually starts! You can submit your vote by commenting on the blog post. Also, if you are interested in doing a bag a month with us, but live far away, we will definitely ship a kit to you, so you can be a part of the fun too! So, on to the fun part!
For January, I thought we could start with a simple pieced tote/handbag. I'm going to show you three different patterns that I thought were cute, and you can choose your favorite or tell me if you don't like any of them.
The first bag is called the Building Blocks Bag, from Indygo Junction:
The second pattern is called Charming Totes 4 from Whistlepig Creek. This pattern uses charm packs.
The third pattern is the 4th Quarter Bag from Silk Road Creations.
So all that I need you to do is comment on this post and say which bag you would prefer to sew in January, or if you would rather do something totally different. If you aren't interested in doing a bag of the month on 2011, that's okay too! Hopefully we can find something else to keep you busy. So let me know what you think, and let me know if you have any suggestions for bags for 2011. Thanks!
*IMPORTANT!* Voting for January's bag will end on Saturday, September 18 at noontime EST (just in case anyone is in a different time zone!). Voting for February's bag will begin Saturday, September 11. Happy sewing!
Saturday, May 8, 2010
Product vs. Process Crafting
I hear a lot about "Process versus Process" in material that I read and listen to. I have mostly heard it referring to knitting, but it can be applied to sewing as well. It can actually be applied to anything that you can think of (some you may have to think harder than others), but we'll just focus on crafting.
Process crafters are simply crafting for the sheer bliss of doing something. Knitters love the hypnotizing rhythm of the knits and purls, quilters enjoy cutting large pieces of fabric up into many small pieces, and then sewing them back together, scrapbookers could happily sit for hours trying to find the perfect colors of paper to complement each other. If you find yourself working on projects and you're not really worried about when you get them done, but rather are enjoying the creative process, trying new things and maybe taking risks with the projects, you may enjoy the process more than the finished product. Being a process crafter can be described as crafting for yourself, rather than for other people. This means crafting for the purposes of relaxation, maintaining sanity, etc, not necessarily making crafts for yourself.
Product crafters are more pleased with the finished product, rather than enjoying the time when they are making the project. This is pretty self-explanatory. Your projects may have a deadline (even if the deadline is vague or mobile), and you may not particularly love the project while you're making it, but once it is done you do like it. Product crafters will craft for other people, whether it is for the purpose of gifting or selling.
I have tried very hard to decide which type of crafter I am. I really do enjoy the process of most crafts. I love knitting and sewing, and I'm happy to do either of those all day. Scrapbooking is another story. I love the finished scrapbooks, but I am not really good with colors and patterns, so I don't enjoy trying to figure out what should go where. I got a scrapbook for my wedding from a cousin who makes them for a living, and it is beautiful. When it got to us, all that we had to do was choose pictures and insert them into the book. I chose the pictures and had them printed, and there the scrapbook and pictures sat, for a year and a half. Finally, a friend of mine was visiting and decided to do it for me, since I clearly was never going to do it. The finished product looks great now, but the process was not very exciting for me.
There also seems to come a point for me in most projects that I stop enjoying the process and am just waiting for the product. I tend to go pretty wild in choosing really large projects, like queen sized quilts, six foot long cable scarves, and the like. I can temper this disenchantment by keeping smaller, simpler projects going on the side, which messes with my deadline but keeps me from tossing the larger projects altogether. I also have this obsession with making lists of projects that I am either working on currently or have promised to people, and I love to cross things off that list, which appeals to the product crafter side of me. My husband also tells me that if I were truly a process crafter, I would knit a huge piece of fabric and then rip it all out, and just be happy because I was able to knit for a while. I'm not that in love with the process.
What kind of crafter are you? Do you appreciate the time spent working on the project, or do you relish the finished product? Or, are you a little of both? I would love to hear your points of view on this subject!
Wednesday, April 14, 2010
(finally) Finishing your hat!
Hello! I want to apologize again for keeping you all hanging on finishing your hat. Hopefully I will be a bit more on the ball for the next knitalong or quiltalong.
I did, however, finally finish my hat so I can tell you about it! Once you have finished your final round for the leaves, you are done with the red yarn, and the decreases are worked using only the green yarn. Cut a short tail off of the red yarn (maybe 2 to 3 inches), and leave it hanging inside the hat. Start round 31 in the pattern with your green yarn. You've already done some k2tog's if you did the earflaps, but here's a refresher video:
http://www.knittinghelp.com/videos/decreases
You can choose to do either the k2tog on the left at the top, or the ssk on the right at the top. I tried it both ways and it didn't look too terribly different. Follow the pattern until you have 9 stitches left. You are then going to knit those stitches for six rows, forming the stem. Then, the final row consists of k2tog 4 times, and then knitting the last stitch. You'll have five stitches left, and you will need to cut a tail and thread your tapestry needle with that tail. Then you need to draw the yarn through the last five stitches, and pull them closed. I then put the needle down through the center of the stitches (or as close as I could get), and pulling the stem inside out, tied a knot to secure the yarn, and wove the end in a bit. To weave in all of your ends, I basically just thread the ends on my needle, and then pull them through some of the purl bumps going in one direction, and then I come back through a few bumps in the other direction. There are lots of videos on youtube if you are interested in seeing how other people weave in their ends. Here is what my hat looked like before weaving in the ends or adding straps:

Once you are done weaving in your ends, you can add straps to your hat in a couple of different ways. I knit what is called an Icord, and a video to show you how to do that is here. You'll have to scroll down until you find the video, it's close to the bottom. The Icord is a knitted tube. To do mine, I picked up three stitches at the bottom of my earflap like so:

I then started knitting the icord off of these three stitches. You can also pick up a few stitches and knit back and forth, creating a flat strap with the purl bumps on both sides of it. Another option is to pull one long length of yarn through each of these three stitches, and then braid them together to create braided straps. Or, you can leave straps off altogether.
You can then embellish your hat by adding seeds if you would like, using the duplicate stitch. Take your black yarn, and duplicate the v's made by various knit stitches wherever you would like seeds to be. I chose not to do this once I finished my hat. After this, you are done! Here is a picture of my finished hat:

It would be nice if I had something other than a glass to model the hat, but times are tough and we have to use what we have!
That's it for this knitalong. I would love to see pictures, you can email them to me at alexandyjATgmailDOTcom. Is there something in particular you would like to knit or sew next? I will try to be better about timely posts in the future, so let me know what you are interested in doing. I hope you enjoyed doing this knitalong!
Wednesday, April 7, 2010
I'm still here!
Hi everyone, I just wanted to let you know that I am still here! I know I haven't blogged in a really long time. It's been a little crazy around here, with the Maine Shop Hop happening during the month of April, and my husband and I are getting ready to move, and we have family visiting. I haven't had any time for any knitting, let alone working on my hat and taking pictures. I have a baby blanket on my needles for a baby born last Saturday, and I thought I would be done by the time he was born, but I'm only half done. I promise I will blog about the rest of my hat soon, but until then, if you have any questions just drop me an email at alexandyjATgmailDOTcom, or comment on this post. I apologize again for the long absence.
Friday, March 26, 2010
Knitalong: working on the hat body
Have you been working on the body of your hat? I have, and thought of a few things I should tell you. If your stitches feel tight on your needles, that's okay. As you go along, your stitches will get looser, so don't worry about that. Also, in the pattern, it says to do a specific number of rounds, but in the earflap hat pattern from Julie (http://heyjulie.wordpress.com/2007/03/20/babykids-earflap-hat/), she says to knit the body of the hat until it is 3.5 inches from the cast on edge, so I did that rather than the specified 25 rounds, and I had to do a few less rounds in order to get my length. Now I'm ready to start in on my green yarn to make the leaves. Here's a picture of the body of the hat:


Once the body is the length that you want, we'll start adding the green yarn. Where the pattern says "Leaves" is where we start. You'll add in the green at the beginning of the round, and just leave the tail hanging to the inside of the hat. Knit 1 stitch with the green yarn, carry the red yarn behind the green, and knit 7 stitches red. Repeat this combination of 8 stitches until you reach the first green stitch again. Then, start round 27 by knitting 3 stitches in green, and knitting 5 stitches with the red yarn. Carry the yarn you are not using behind the stitches on the inside of the hat. Here is a picture of what my hat looks like after finishing out the body of the hat.


And here is a picture of the inside, where I carried the yarn I wasn't using across the back of the other stitches I was knitting:

That's it for the hat body. As always, if you have any questions, don't hesitate to ask! Next time we'll do the decreases for the top. Hope to see you then!
Monday, March 22, 2010
Knitalong: Adding earflaps and beginning the hat
I hope your earflaps turned out well, and now it is time to start the body of our hat! To start, you need to learn to do the cable cast on (video here), if you don't already know how to do so. A tip for this cast on: don't pull the stitches tight after transferring each one from the right needle to the left needle. You need to try to keep this cast on loose in order to make it easier on yourself.
Cast on 10 stitches using the cable cast on. If you are using double pointed needles, I would suggest trying to get as many stitches on the needles as possible, and then moving them around to space them out afterward. For example, I wanted 24 stitches in between the earflaps to be on my middle needle, and the earflaps to be on the other two needles, along with the rest of the stitches. I cast on as many stitches as would fit onto the first needle, then moved some over, and then I continued to cast on. It can be pretty difficult to try to cast on stitches over the gap created by two different needles, so we'll try to make it easier on ourselves. Once you've cast on your first 10 stitches, you are going to knit the first earflap right on after your 10 stitches. Here is a video that Julie posted on how to do this:
http://www.youtube.com/watch?v=IJ0i6XWFwa8
After you've knit the first earflap on, cast on 26 more stitches. Then, knit the second earflap on. Finish by casting on 10 more stitches. Now, you can join your round. To join, just start knitting into the first stitch that you cast on. Once you knit the stitch, pull the tail tightly to make sure there isn't going to be a huge gap. Note: for the first few rounds, there will be a gap, but just do your best to tighten the stitch joining the last and first stitches, and we'll be able to close that gap at the end. Make sure that your stitches aren't twisted! If you look at all of your needles, the cast on edge should be closest to the floor when you hold your needles parallel to the floor. If this edge comes up and over one needle in any spot, it means that you twisted your stitches, and you will end up with a fabric that you definitely don't want for this project. If you are knitting on double point needles, you will want to make sure that you also tighten the first stitch that you knit off of every needle, just like you did the first stitch. Gaps can form between your double point needles, and pulling the first stitch on every needle tight will decrease your chances of "ladders," or spaces between each stitch that run all the way up the fabric.
Once you've joined your cast on round, you can start knitting! In the pattern that I gave to you, I made a mistake on Round 1. It should read as follows:
Round 1: k9, k2tog, k12, k2tog, k25, k2tog, k12, k2tog, k10.
All this row is going to do is close up the gaps that formed around the earflaps when you knit them into the cast on row. You can skip reading this row, and just do Round 1 as follows if you feel comfortable doing so:
Round 1: Knit to one stitch before the first gap on earflap one. Knit two stitches together to close the gap. Knit to one stitch before the second gap on earflap one, knit two together to close the gap. Knit until one stitch before the first gap on earflap two. Knit two together to close the gap. Knit until one stitch before the second gap on earflap two. Knit two together to close the gap. Knit until the end of the round.
Once you finish your first round, it's just straight knitting until you want to start making the hat smaller to fit the top of the recipient's head. Here is a picture of my hat after I finished Round 1:

It's looking a little weird right now, but once I get some more rounds done for the body it will actually look like a hat! :) When knitting the body, the pattern specifies knitting for 25 rounds. Julie's pattern says to knit for about 3.25 inches from the cast on edge. If you are able to measure the intended recipient's head from how far down they want the hat to go on their head (whether or not they want it to cover their ears, etc) to where their head starts sloping in at the top, you'll know how long to knit your hat body. For adult hats, it can be from 4.5 inches upward, usually, and some adults have smaller heads. You can guess as well, because if you did the earflaps, the hat itself doesn't have to go down over their ears. Just make sure that you are tightening your stitches between each needle. If you're on a circular needle, you don't have to worry about that.
That is all for today, I believe. Do you have any questions? Are you doing something crazy weird and don't even know what the right question to ask would be? Let me know in the comments, or you can email me (alexandyjATgmailDOTcom replace the uppercase words with the appropriate symbols). Remember, I'm also available to help in person if you are having trouble. Just let me know! Once we get the body done, we can start on the leaves. See you next time!
Saturday, March 20, 2010
Correction in the earflap hat pattern
Hi everyone, I just wanted to post real quick to let you know that in the pattern I posted, there is a mistake, right in Row 1! Sheesh, can't trust me with anything! The original pattern for Row 1 said to knit until there is one stitch, and noticeable gap, and then another stitch, and knit those two together to close the gap. There are four gaps, one on each side of the two earflaps. Row 1 in my pattern should read as follows:
Row 1: k9, k2tog, k12, k2tog, k25, k2tog, k12, k2tog, k10.
This will hopefully give you the right first row. That's what I did and mine turned out fine. Let me know if any of you have any problems. Pictures tomorrow, but right now I have a date with my husband and the cats. We're watching Gone With the Wind, and everyone is very excited. Goodnight!
Monday, March 15, 2010
Earflaps!
Good morning everyone! I finished my earflaps last night, and I am ready to cast on for the hat. Before I do so, however, I wanted to show you a couple of pictures of what your flaps might look like. Here's one looking at the right side of both flaps:


These flaps look really large for baby ears to me, but I guess it's better to have their ears covered well! The edges farthest away from the needles are my cast on edges, and you might be able to see the tails there. I cast on 7 stitches using the long tail cast on, per the pattern. Then, you need to turn your needle and start going right to left again, on the wrong side of the piece. You are going to knit the first stitch, purl to the last stitch, and then knit the last stitch. Turn your work again, and knit the first stitch, knit the front and back of the second stitch (video here), knit to the last 2 stitches, knit the front and back of the second to last stitch, and knit the last stitch. Every time you knit into the front and back of a stitch, you are adding a stitch. This means for every right side row that you do, you should be adding two stitches total. I try to make sure I am counting every once in a while so I don't miss an increase. Once you have 15 stitches on the needles, you'll be on a wrong side row. You can then purl every stitch in this row. Turn your work so you're on a right side row, and knit every stitch. Continue this until your earflap is the length that you want it. Mine are 3.25" long. Once I knit my first earflap, I set that needle aside after cutting the yarn and used another needle to knit the second earflap. You can either keep track of the rows that you knit straight on the first earflap, and then keep track on the second one so they are the same, or you can just hold them one on top of the other to make sure they're roughly the same size. :)
Here is a picture of the right side of one earflap, and the wrong side of the other:

You'll notice that the earflap on the left is showing the purl bumps on the wrong side, and the earflap on the right is showing the knit v's on the right side. I tried to make sure that my last row on the earflaps was a wrong side, or purl, row, but it doesn't really matter for our purposes. You might also be able to see that the sides of the earflaps are curling in a bit. That's okay, because each earflap is small enough that it will resist curling too much. In the pattern, I specified to leave a tail when you cut the yarn from the ball at the end of each earflap, and said that 12 inches would be long enough. That will definitely be long enough, but I made my tails between 5 and 6 inches. You want to have enough of a tail that you can securely weave in the ends, but the earflaps are getting knit right into the cast on edge, so it doesn't need to be too long.
Alternatively, if you don't want to do the earflaps, you don't have to. You can just cast on for the hat and start knitting, and once you get to the end you will have a hat with a brim that rolls, so you may want to make the body a bit longer. If you are interested in this, you can wait until I cast on for my hat and just pick up with me there.
That's about it for the earflaps. Take your time when making these, because it's possible that you're learning a couple of new things while knitting these. Let me know in the comments how you are doing, or if you have any questions. Also, like I mentioned before, I am available to help in person if you are around the Presque Isle area, so just let me know if you would like that. If you want to send me some pictures (and I would love to see any!), you can email them to me at alexandyj(at)gmail(dot)com, and let me know if you're okay with me putting them on the blog or not. Thanks for knitting with me!
Saturday, March 13, 2010
National Quilting Day Party!
You are invited to join us at the 19th Annual National Quilting Day! Garden Gate Fabrics and Sewing with Sheila have the downstairs North Room at the Presque Isle Inn and Convention Center reserved. We are starting at 9:30 am and sticking around until 3 pm. There is a ramp to get down there on the side of the building, or drive to the far end of the parking lot and walk down stairs right into the room. However, we would prefer that you to come in through the side door. The temperature of the day will dictate which entrance will be best. The entrance fee for this event will be $2.
The websites here tell of the history of National Quilting Day and there is a national project planned for the day. You may do this on your own or a group of you could do this together.
Some other charities you might be interested in sewing for on this day are the 1 million pillowcase challenge (http://www.allpeoplequilt.
There will be tables set up for us to sit and sew for the day. You may do the project that is listed above or bring a UFO. We have demonstrations lined up. Sheila will be doing some machine quilting and making double layered dinner napkins. Alex will be demonstrating the Go Cutter and there will be a supply of them for you to buy. Sylvia has asked all of the machine quilters in the area to display their work. Garden Gate Fabrics and Rather B Quilting will be vendors at this event. We have asked for some door prizes from different companies, and we have received prizes from Quilter’s Dream and Benartex. We have games to play. One of them is LCR (Left, Center, Right). All of you can play this… Your ticket to get to play is to bring 3 fat quarters of quilt shop quality and we will start a game every time we have 10 players. It is a dice game and will last about 30 minutes. At the end of the game the winner will take all 30 of the fat quarters. This is enough to make a queen sized quilt!
We hope you can join us on this day for fun, demonstrations, and food. As a reminder, the day is Saturday, March 20, from 9:30 am to 3 pm, at the Presque Isle Inn and Convention Center, and the entrance fee is $2. See you then!
Friday, March 12, 2010
Earflap hat pattern
Happy Friday, everyone! I'm just going to post the hat pattern in this post, and maybe sometime in the future I'll figure out how to put it as a file on the sidebar. The following is the pattern for the baby hat:
Earflap hat
This pattern is adapted from two different patterns, the first from Julie over at http://heyjulie.wordpress.com/ (check out the comments on the different patterns to get tips and tricks) and Knitchicks http://www.knitchicks.co.uk/.
Size: 6-12 months
Gauge: 19 sts=4” in stockinette stitch.
Materials: * 100 yds of DK or worsted weight yarn.
* Double point or circular needles of the size that gets gauge (the author of the pattern uses US6, I used US8).
* Stitch marker
* Tapestry/yarn needle for weaving in ends
Abbreviations:
CO=cast on
K=knit
P=purl
Kfb=Knit front and back (increase)
st=stitch
k2tog=knit two stitches together
Ear Flaps:
CO 7 stitches.
Row 1: K1, P to last stitch, K1.
Row 2: K1, Kfb, K to last 2 stitches, Kfb, K1.
Repeat these two rows until there are 15 stitches on the needles.
Knit in stockinette stitch until piece measures 3.25”.
Cut the yarn, leaving a long tail (12 inches is long enough), and leave the earflap on the needle. If using double point needles, just put that needle to the side and use another one from your set, if you’re using a circular needle, move the earflap to the middle of your cable, and work back and forth for the second earflap on your needles at the end of the cable.
Repeat these instructions for the second earflap.
Hat:
Using the cable cast on, CO 10 st on an empty dpn or your circular needle. Knit 15 st from one earflap right after your tenth cast on stitch. CO 26 st, knit 15 st from second earflap, CO 10 st. You should have 76 stitches.
Join, being VERY careful not to twist any of your stitches. If you are using a circular needle, place a marker before joining, right after your last cast on st.
Row 1: K9, k2tog, k13, k2tog, k24, k2tog, k13, k2tog, k9. This will leave 72 st.
Knit every st in the round for 25 rounds.
Leaves:
Round 26: *K1 green, K7 red, repeat from *.
Round 27: *K3 green, K5 red, repeat from *.
Round 28: *K5 green, K3 red, repeat from *.
Round 29: *K7 green, K1 red, repeat from *.
Round 30: *K7 green, K1 red, repeat from *.
Decrease for crown:
Use only the green yarn, leave the red tail hanging.
Round 31: *K6, k2tog, repeat from * (63 st left).
Round 32: *K5, k2tog, repeat from * (54 st left).
Round 33: *K4, k2tog, repeat from * (45 st left).
Round 34: *K3, k2tog, repeat from * (36 st left).
Round 35: *K2, k2tog, repeat from * (27 st left).
Round 36: *K1, k2tog, repeat from * (16 st left).
Round 37: *k2tog, repeat from * (9 st left).
Rounds 38-43: Knit every stitch (this creates the stem).
Round 44: K2tog 4 times, K1.
To finish, cut a tail from the green yarn (6 inches should do). Thread the tail into your tapestry needle, and draw the tail through the remaining 5 stitches. Pull the tail to the inside of the stem. Tie a knot around a couple of stitches to secure, and weave the tail through a few stitches. Weave in the ends, and you’re done!
There is also a link to an adult sized earflap hat on Julie's blog, here. It would appear that all she did to get an adult sized hat was go up a few needle sizes, so that's easy enough. If you want to use the needles you picked out for the yarn you bought, all you'll need to do is take the number of stitches you got per inch on your gauge swatch and cast on the number of stitches needed to get your hat circumference. You want your hat to be slightly smaller than the head you're making the hat for, so it won't fall off. For example, if you are making the hat for a head measuring 14 inches, you'll want to make the hat around 13 inches in circumference. This means that if you got 5 stitches per inch on your gauge swatch, you'll need to cast on 5 x 13 stitches, or 65 stitches. Knitting can get very mathematical, but not to worry, we can get through it! :) If you are looking at this pattern and are freaking out a little because there are a million abbreviations and words you don't know, don't worry. We'll go through them step by step. I'll be working on my earflaps today and posting about them soon, so we can get this hat going! If you want to start working on your earflaps too, here is a link to videos explaining the "kfb" stitch, which is an increase stitch. Scroll down this window until you see "KFB" on the right side of the knitted piece, and watch the video for whichever knitting style you're doing. It helps to watch the video more than once, or to do one step, pause the video, do another step, pause the video, etc.
Wednesday, March 10, 2010
Mittens galore!
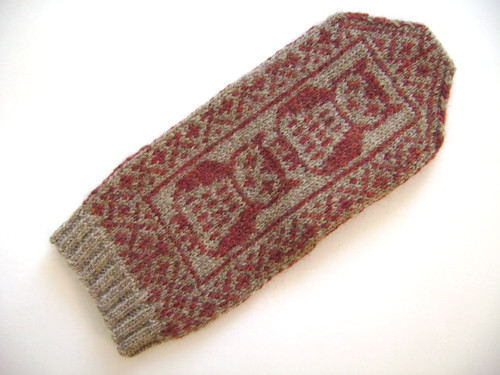
I told you that I finished the mittens for my brother-in-law Gabe, and here is a picture of them finished:


My sister's boyfriend is a big Red Sox fan, so after the mittens are completely knit, I'll be using a Boston Red Sox graph to duplicate stitch the Boston "B" on the mittens. I'm pretty excited to see how they turn out. He knows he is getting mittens that are being made especially for him, but I'm pretty sure he hasn't been told they are going to be Red Sox. Also, I'm pretty sure he doesn't read this blog, so I thought I was probably safe to share my plan with you.

I know they're not really exciting, since that last picture you saw of them was when they were almost finished. Since I finished these mittens, I decided to focus solely on Chelsea's scarflet and finish that. I blocked it, which was magic. I have the Vogue Knitting book, which has lots of information about pretty much anything you could ever want to know about knitting. A section of this book discusses the different ways to block a garment, and I chose to wet block the scarflet. This involved me pinning the scarflet out to the correct dimensions on my ironing board, and then spritzing it with a spray bottle until it was damp. Then, I let it sit overnight, and got up early the next morning to rescue it from the ironing board before my husband unpinned it and undid all of my blocking in order to iron his clothes for work. After rescuing it, I discovered that it was no longer curly! Before blocking, the sides curled in and touched each other, which made the scarflet look kind of funny. After wet blocking, it was lovely and flat. I felt very good about myself. Then, I just had to knit a couple more rows in order to get the button holes on the scarflet, and then sew the buttons on. Voila!
There should be a picture of the finished scarflet here, but I forgot to take one before I gave it to Chelsea, and now that I've finally finished it, it's too warm for her to wear it.
The next project I started working on was a pair of mittens for my sister's boyfriend that were supposed to be for Christmas past, but she didn't ask me to make them until after Christmas, so I feel like I'm pretty much off the hook. He has really big hands.

This is my hand on top of the first mitten. I'm a little worried now, because I don't have small hands, and I didn't realize that the mittens were quite this large. Fortunately, my husband also has really big hands, so he gets to try on everything that I make. I told him that I was very lucky to have him, since I'm a smallish person, and he's a largeish person, so between the two of us we should be able to make anything to size! He was not as excited about that prospect.

The second mitten's cuff is in progress. After I knit the second mitten, I'll knit the thumbs. I save the thumbs to do at the same time, because for whatever reason, once I get to the thumbs I'm really confused. To prevent two different times of being confused, I simply knit the thumbs one right after the other so I can get weirded out on the first thumb but know what I'm doing for the second. One time when I went to do the thumbs, I forgot whether I was supposed to knit them in the round clockwise or counter-clockwise, and ended up knitting the first thumb inside out. I'm not sure why I have so much trouble with thumbs, but maybe if I keep making mittens I'll finally figure it out.
I wish I had something to show you from my sewing life. I have, in fact, been sewing. We are participating in the Maine Shop Hop, and each participating shop needs to make a sample out of the chosen line of fabric. I have been trying very hard to make samples, but each time has been, no exaggerating, an abject failure. I'm pretty okay with this, because I get a feeling in my stomach when starting a project if it's going to turn out poorly, and I pretty much just try to suppress it and plow through. So, I now have a couple of weird looking star blocks to show for it, and we have decided to do a sample from a pattern rather than from my head, and perhaps my mom will sew it, just to be safe. Pictures of sewing will come, I promise!
I hope you are all able to enjoy the sun a little bit. Hold onto hope, spring is coming!
Saturday, March 6, 2010
Swatching!
Hi everyone! I hope you were all able to gather your materials for the knitalong. I spent the morning trying to take pictures and videos of myself making a slipknot, casting on, and knitting and purling rows for my swatch for those of you who are just learning. I'm not very good at working cameras, or technology in general, so I have made an executive decision to let it go, and point you to some excellent videos that have already been made. For one, I want to pat myself on the back for letting it go, because I have a hard time with that. Two, these videos are much much nicer than anything I could have made, because they have sound as well. Mine didn't, which actually made them kind of weird to watch. I'm used to awkward silences, but not everyone is! :)
First, I want to encourage everyone who will be doing this project along with me. Some parts will seem hard, and you may be learning a lot of new things in this project. I'm going to try to go pretty slowly, so that everyone who wants to get it can, and I want you to ask me if you have any questions at all. I'm also available to help in person, if you're around Presque Isle. I am happy to do anything I can to help anyone who needs it, so don't hesitate to ask. The main thing to remember is to go at your own pace. Mine is slow, and that's a good pace for learning. You will get less frustrated, I promise!
The website I'm going to link to is called Knitting Help. I have watched countless videos on this website to help me learn how to do new things, or remember how to do things that I've done a lot, which happens more often than not. This is an excellent resource. The Lion Brand Studio has a Youtube channel as well, which has a pretty large number of videos for knitters and crocheters. Click the following link to get to Knitting Help:
www.knittinghelp.com
And click this link to get to the Lion Brand Youtube channel:
http://www.youtube.com/user/LionBrandYarn
Those links will take you to the homepage, and I'll give you a couple of specific links for things we'll need to learn.
Okay! So today we're going to do a gauge swatch! I have to confess to you that this will be the first project that I've swatched correctly (assuming I swatched correctly, of course). I hate swatching, because I think that swatching time is wasting time that I could be spending actually knitting the project! However, I have had lots of tears due to a lack of swatching, so we're going to do it for this one and get everyone into the habit.
A note for the following videos: the method I use for knitting is called the "English method," and I would find that easier for beginners. Also, I hold the yarn in my right hand between my thumb and forefinger, rather than wrapping it around several fingers like the woman in the video does. If you are just learning how to knit from these videos, they suggest the "Continental method," which is supposed to be better for tension, and possibly quicker. It will take you longer to get comfortable with it, in my opinion, but it might be better in the long run. The continental method is also suggested for left-handed knitters who have a hard time getting their right hand to do anything.
First to start our swatch, you need to make a cast on row. You can use whatever cast on method you like; I'm going to use the long-tail cast on. Here is a link for a long-tail cast on video:
http://www.knittinghelp.com/videos/cast-on
I read somewhere that you should make the tail three times the length of your piece. Since the swatch is going to be around 4 inches, you should leave a 12 inch tail.
To find out what we are supposed to be doing for our swatch, we look at the part of the pattern that says, "Gauge." Nobody has the pattern yet, because I don't know how to put files on the sidebar yet. If you really would like to have the pattern right now, email me at alexandyj@gmail.com and I'll email it back to you. The pattern for the baby hat calls for a gauge of 19 stitches=4" in stockinette stitch. You can do this swatch for the adult hat too, since if you bought a worsted weight yarn, chances are good that the needle size specified was an 8 or 9. What you'll need to do is cast on 19 stitches, first of all. The long tail cast on creates a knit row as well as casting on, so you'll end up having to purl all the stitches when you actually begin the swatch after the cast on row. So, after you've cast on your 19 stitches, turn the work and purl every stitch. Here's a video for purling:
http://www.knittinghelp.com/videos/purl-stitch
Make sure that when you are purling, you are holding your working yarn IN FRONT of the work, rather than IN BACK, like you would for knitting. I didn't think of this when doing ribbing for the first time, and couldn't figure out why it looked so wild. Purl every stitch on this first row.
Then, you will turn the work again. You're going to knit this row. Here's a video for knit stitch:
http://www.knittinghelp.com/videos/knit-stitch
Knit every stitch on the second row. If you look at the swatch, you can see bumps on one side, and v's on the other.

The swatch on the left has the bumps, and the swatch on the right has v's, if you can see them in this blurry picture. The side with the bumps is considered the wrong side, and when you're working this side you will purl every stitch. The side with the v's is considered the right side, and when you're working this side you will knit every stitch. This will create a fabric that looks different on both sides, called stockinette stitch. If you knit every stitch in every row, right or wrong side, you would have a fabric with all bumps. This is called garter stitch. We are going to do our swatch in stockinette stitch, so knit the right side and purl the wrong side.
You should have to do about 25 rows in order to get to four inches, counting the first purl row that you do as row 1. You can count how many rows you've done by picking one of the columns of v's, and counting each v in the column.

If you are looking at this picture, and you count one column starting with the first full knit stitch (I left out the half one that got cut off at the bottom), there are ten rows. So get to the point where you've done around 25 rows. Your swatch will be curly, that's okay. Stockinette stitch curls, so as a general rule needs to have some sort of border around it or some incorporation of purl stitches on the knit side to keep it from curling. Garter stitch does not curl at all, making it great for dishcloths, scarves, and other things that are supposed to be flat.

When your swatch is done, you can pin it to an ironing board, or another similar surface. Try as hard as you can not to stretch the swatch, since this will give you incorrect gauge. I laid the swatch on my ironing board, and smoothed it out gently in whatever place I was pinning it. I then put down my tape measure and placed a pin at the 1 inch mark, and at the 2 inch mark. I lined up the 1 inch mark with the side of one column of v's first. Then, I counted from the pin on the left to the pin on the right to see how many v's were in between them. I ended up getting 4.5 stitches per inch on this swatch, which means that my total swatch width is a little over 4 inches, and 18 stitches would have been better than 19. Sometimes half a stitch off doesn't make that much difference, like in a baby hat. However, if you are making a sweater that is, say, supposed to be 50 inches around, and the gauge calls for 5 stitches per inch and you get 4.5, for every inch that the sweater is supposed to be, you'll actually be close to an eight of an inch off. If you cast on the number of stitches called for in the pattern anyway, ignoring your gauge, your sweater would be a little more than 6 inches too small. That sounds really confusing, but hopefully it's understandable.

When measuring my gauge from the left side to the right side, my suspicions that I'm off a little bit were confirmed. My swatch is almost 4.25 inches in width, rather than 4 inches. Like I said, I'm not too worried about this, because I would rather have the hat be too big, than for me to go down a needle size or cast on less stitches and have it be too small. If you are way off on your swatch, that's okay. I had to go up two needle sizes to get this gauge from what the pattern called for, but I knew that ahead of time so didn't try to swatch with the needle size called for. I'm going to knit the hat on these needles.
There are a couple of different things you can do with your swatch as well. Some people cast the swatch off the needles (instructional videos here http://www.knittinghelp.com/videos/casting-off) and keep it in a photo journal with pictures and information on the finished project, such as what yarn was used, who the project was for, etc. I think this would be really cool to do, because I've already forgotten some of the projects I've done, and it would be fun to look back and see them. Others will just keep the swatch around until the project is done, in case you need to refer back to it. Some people wash their swatch exactly how they're planning to wash the finished project, if they are not sure how the yarn will react. Some people, like myself, will unravel the swatch so the yarn can be used in the project. I've also heard of people who keep swatches sewing them together into blankets for charity, using them as potholders, or some other creative use.
I feel like I'm forgetting to tell you a lot of important information. If you would like to know more than I told you here, comment on the post and I'll get back to you. This is my first time teaching, so I'm sure I'll make lots of mistakes and will need your help! I'd also like to know if you are making this, who you are making it for, and whether or not this project will be a first for you, whether your first knitting project, your first time knitting in the round, or anything else. I'm really looking forward to this knitalong, and I hope you are too!
Subscribe to:
Posts (Atom)